Editor Utility Widgets in Unreal
2023-05-03
This post will be a short guide for making an Editor Utility Widget in Unreal 5.1. Using Python to extend the main menu with our own submenu, to which we will add a button. Making it easier for artists to find it. Should work for versions 4.27 and later, but to be safe you can use the same version as me following along.
Setting up the Project
Open the Epic Launcher and create a new project. For this I made a new project using the Third Person Shooter template. Once you are in the Editor make sure the following plugins are enabled. In the top menu, go to Edit and at the bottom of the menu you will find Plugins.

After you've verified they are installed you can go ahead, if you had to install any - you have to restart the editor before continuing.
Making the Widget
Create a folder "MyEditorUtility". We will use this to hold our asset. Right click in folder to get context menu, expand "Editor Utilities" and create an Editor Utility Widget. Open the asset for editing by double clicking. In the top right corner, change mode from Designer to Graph.

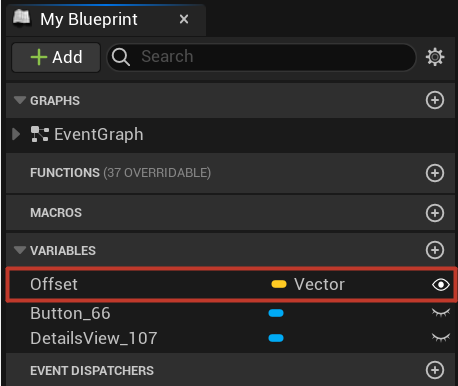
In the "My Blueprint" tab on the left side, add a vector variable. Give it a name "Offset", and make it public by toggling the open/closed eye icon next to the variable.
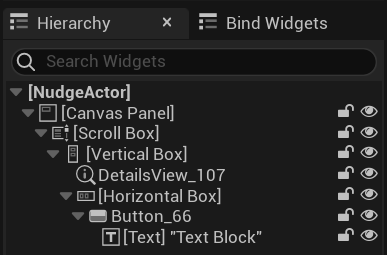
Switch back to designer mode to create the widget hierarchy. Add a Scroll Box to the Canvas Panel, and a Vertical Box to the Scroll Box. Then add a Details View and a Horizontal Box to the Vertical Box. Finally add a Button, with a Text to the Horizontal Box. Making a hierarchy like this.
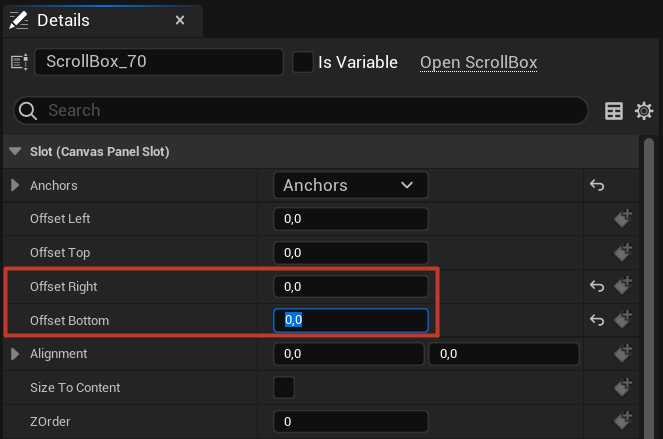
Make the scroll box fill the full canvas by selecting the scroll box. Then dragging the lower right anchor to the lower right corner of the canvas.
Zero out the offsets in the Details panel on the right.
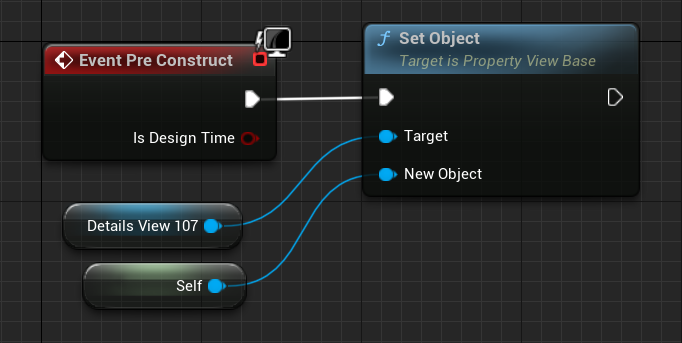
Change back to the graph mode. Find the Event Pre Construct node and drop out the Details View next to it, getting the details view. Drag and drop the view pin to empty space to get the context menu, search for Set Object and add that node. Right click in open space, to again get the context menu. Add a reference to Self. Drag that pin to the New Object input for the Set Object.
Change mode to designer, and select the details view. In the details pane on the right, find Properties to Show and add Offset here.
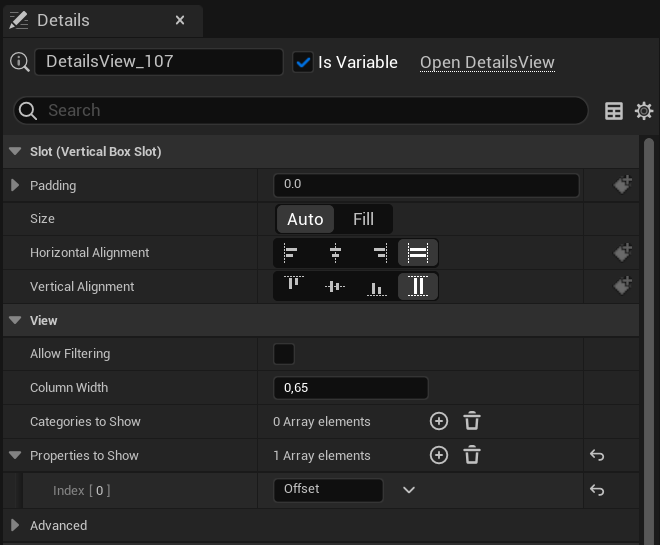
This example is very simple, showing only the one editable property. But using a details view when your tools have multiple variables makes it very easy to organize the properties as they will all have their category as a collapsible group. And each type will display a widget users will recognize, so if one property was a reference to an actor, you would get a drop down list for available actors etc.
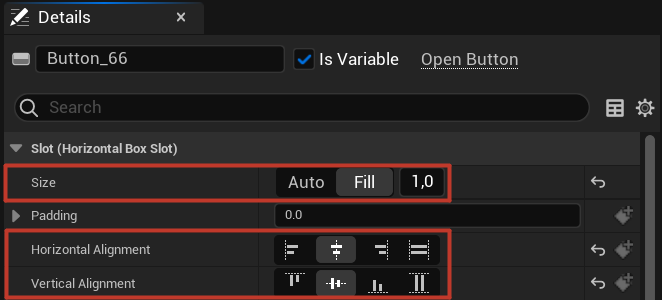
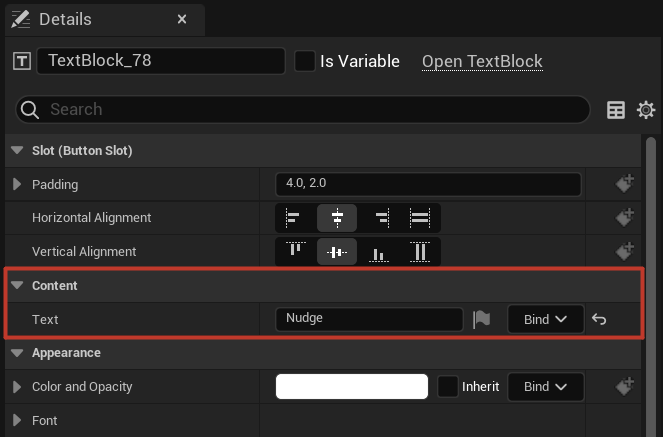
Select the button and change the Size to Fill, then for both Horizontal and Vertical Alignment chose center. I will admit this is the most jarring element in our UI now that doesn't really look like it belongs in Unreal, but for this example I just want a button that offsets all selected actors whenever the button is pushed. Finish the button UI by setting the text to something more descriptive, like "Nudge". Do this by selecting the Text in the hierarchy and find Text under the group Content.
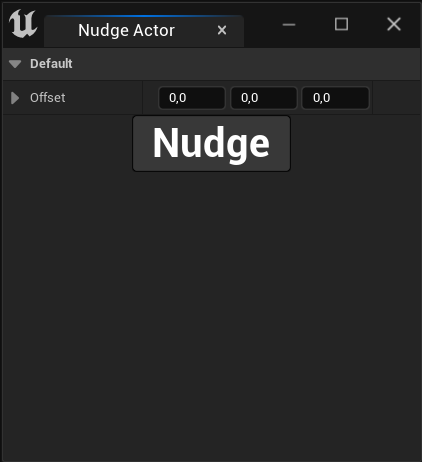
Open a content browser and right click the widget, then Run Editor Utility Widget to see the result.
Implementing the actor offset
Make the button actually do something. Open the widget for editing, select the button and scroll down the details pane to find events. For On Clicked add an event by hitting the big plus button. This takes us to graph mode with the new event On Clicked. Add a Get Selected Actors node, and a For Each Loop. On the Array Element output pin, drag out and Add Actor World Offset. Setting the Delta Location to our offset variable by drag dropping it in the view, getting the variable and plugging it in to the input pin.

For most tools you would also want to allow users to undo whatever changes that were made. Add a Begin Transaction after getting the selected actors. In the loop, set each actor as a Transact Object and add a End Transaction once the loop completes.

Extending the Main Menu
We now have our editor utility widget. But artists will likely not want to search the content browser every time to find it, right-click and hit Run Editor Utility Widget. To make it more artist friendly we can expose it through a menu in the top menu bar. Or anywhere we'd like for that matter if we know the UI Extension Point.
In your file explorer, find your Unreal Project. When you've found the project go into the Content folder, add a Python folder and in it create a init_unreal.py file.
Let's start out importing unreal, and printing "Hello, World!" to the Output Log.
import unreal


def main():
    print("Hello, World!")


if __name__ == "__main__":
    main()
This will create a python script that gets executed on startup, restart the editor and read the log. Or if you are impatient - go to the main menu Tools, and Execute Python Script.... Let's continue by extending the main menu, adding our own sub menu to it.
import unreal


def main():
    menus = unreal.ToolMenus.get()
    main_menu = menus.extend_menu("LevelEditor.MainMenu")
    sub_menu = main_menu.add_sub_menu(
        owner="LevelEditor.MainMenu",
        section_name="MySubmenu",
        name="LevelEditor.MainMenu.MySubmenu",
        label="My Submenu"
    )


if __name__ == "__main__":
    main()
Restarting the editor, or executing the python script again should now have given you another entry to the main menu at the top.

We will keep editing on the init_unreal.py to add a tool menu script entry that will open the widget we've made.
import unreal


@unreal.uclass()
class NudgeActorMenuEntryScript(unreal.ToolMenuEntryScript):
    @unreal.ufunction(override=True)
    def execute(self, context):
        path_to_blueprint = unreal.EditorAssetLibrary.load_asset("/Game/MyEditorUtility/NudgeActor.NudgeActor")
        unreal.EditorUtilitySubsystem().spawn_and_register_tab(path_to_blueprint)


def main():
    menus = unreal.ToolMenus.get()
    main_menu = menus.extend_menu("LevelEditor.MainMenu")
    sub_menu = main_menu.add_sub_menu(
        owner="LevelEditor.MainMenu",
        section_name="MySubmenu",
        name="LevelEditor.MainMenu.MySubmenu",
        label="My Submenu"
    )

    nudge_actor_menu_entry_script = NudgeActorMenuEntryScript()
    nudge_actor_menu_entry_script.init_entry(
        owner_name = "LevelEditor.MainMenu.MySubmenu",
        menu = "LevelEditor.MainMenu.MySubmenu",
        section = "",
        name = "NudgeActorMenuEntryScript",
        label = "Nudge Actor",
        tool_tip = "Open the widget to nudge actors"
    )
    sub_menu.add_menu_entry_object(nudge_actor_menu_entry_script)


if __name__ == "__main__":
    main()
We now have a custom menu which will open the widget utility making it easy for our artists to find it.